If you have ever walked into a lobby that smells faintly of damp cardboard or noticed a ceiling tile blooming with mold freckles above a supply diffuser, you already know humidity does not politely stay in the mechanical room. It sneaks into ductwork, clings to dust, feeds biofilms, and then rides the airstream like a tourist on a hop-on bus. Commercial duct cleaning helps, but not the way a magic wand helps. It is only one player in a roster that includes coils, controls, insulation, and the weather trying its best to undo your efforts.
I have spent too many early mornings in mechanical rooms to romanticize the work. You come home dotted with insulation fibers, your phone full of pictures of drain pans and fan housings, and yet the win is real. A system that starts clean and stays dry behaves better, burns less energy, and offends fewer noses. Here is how to think about commercial duct cleaning alongside humidity control, with the practical judgment that comes from troubleshooting more than a few cranky air handlers.
Dust, Moisture, and the Strange Chemistry of Smell
Ducts do not generate humidity. They distribute it, trap it, or ignore it until it becomes a problem. Dust alone is an irritant and a blemish on a maintenance report. Moisture alone is a physics problem, a set of numbers on a psychrometric chart. Mix them and you get microbial growth, sticky debris, and smells that politely decline to leave.
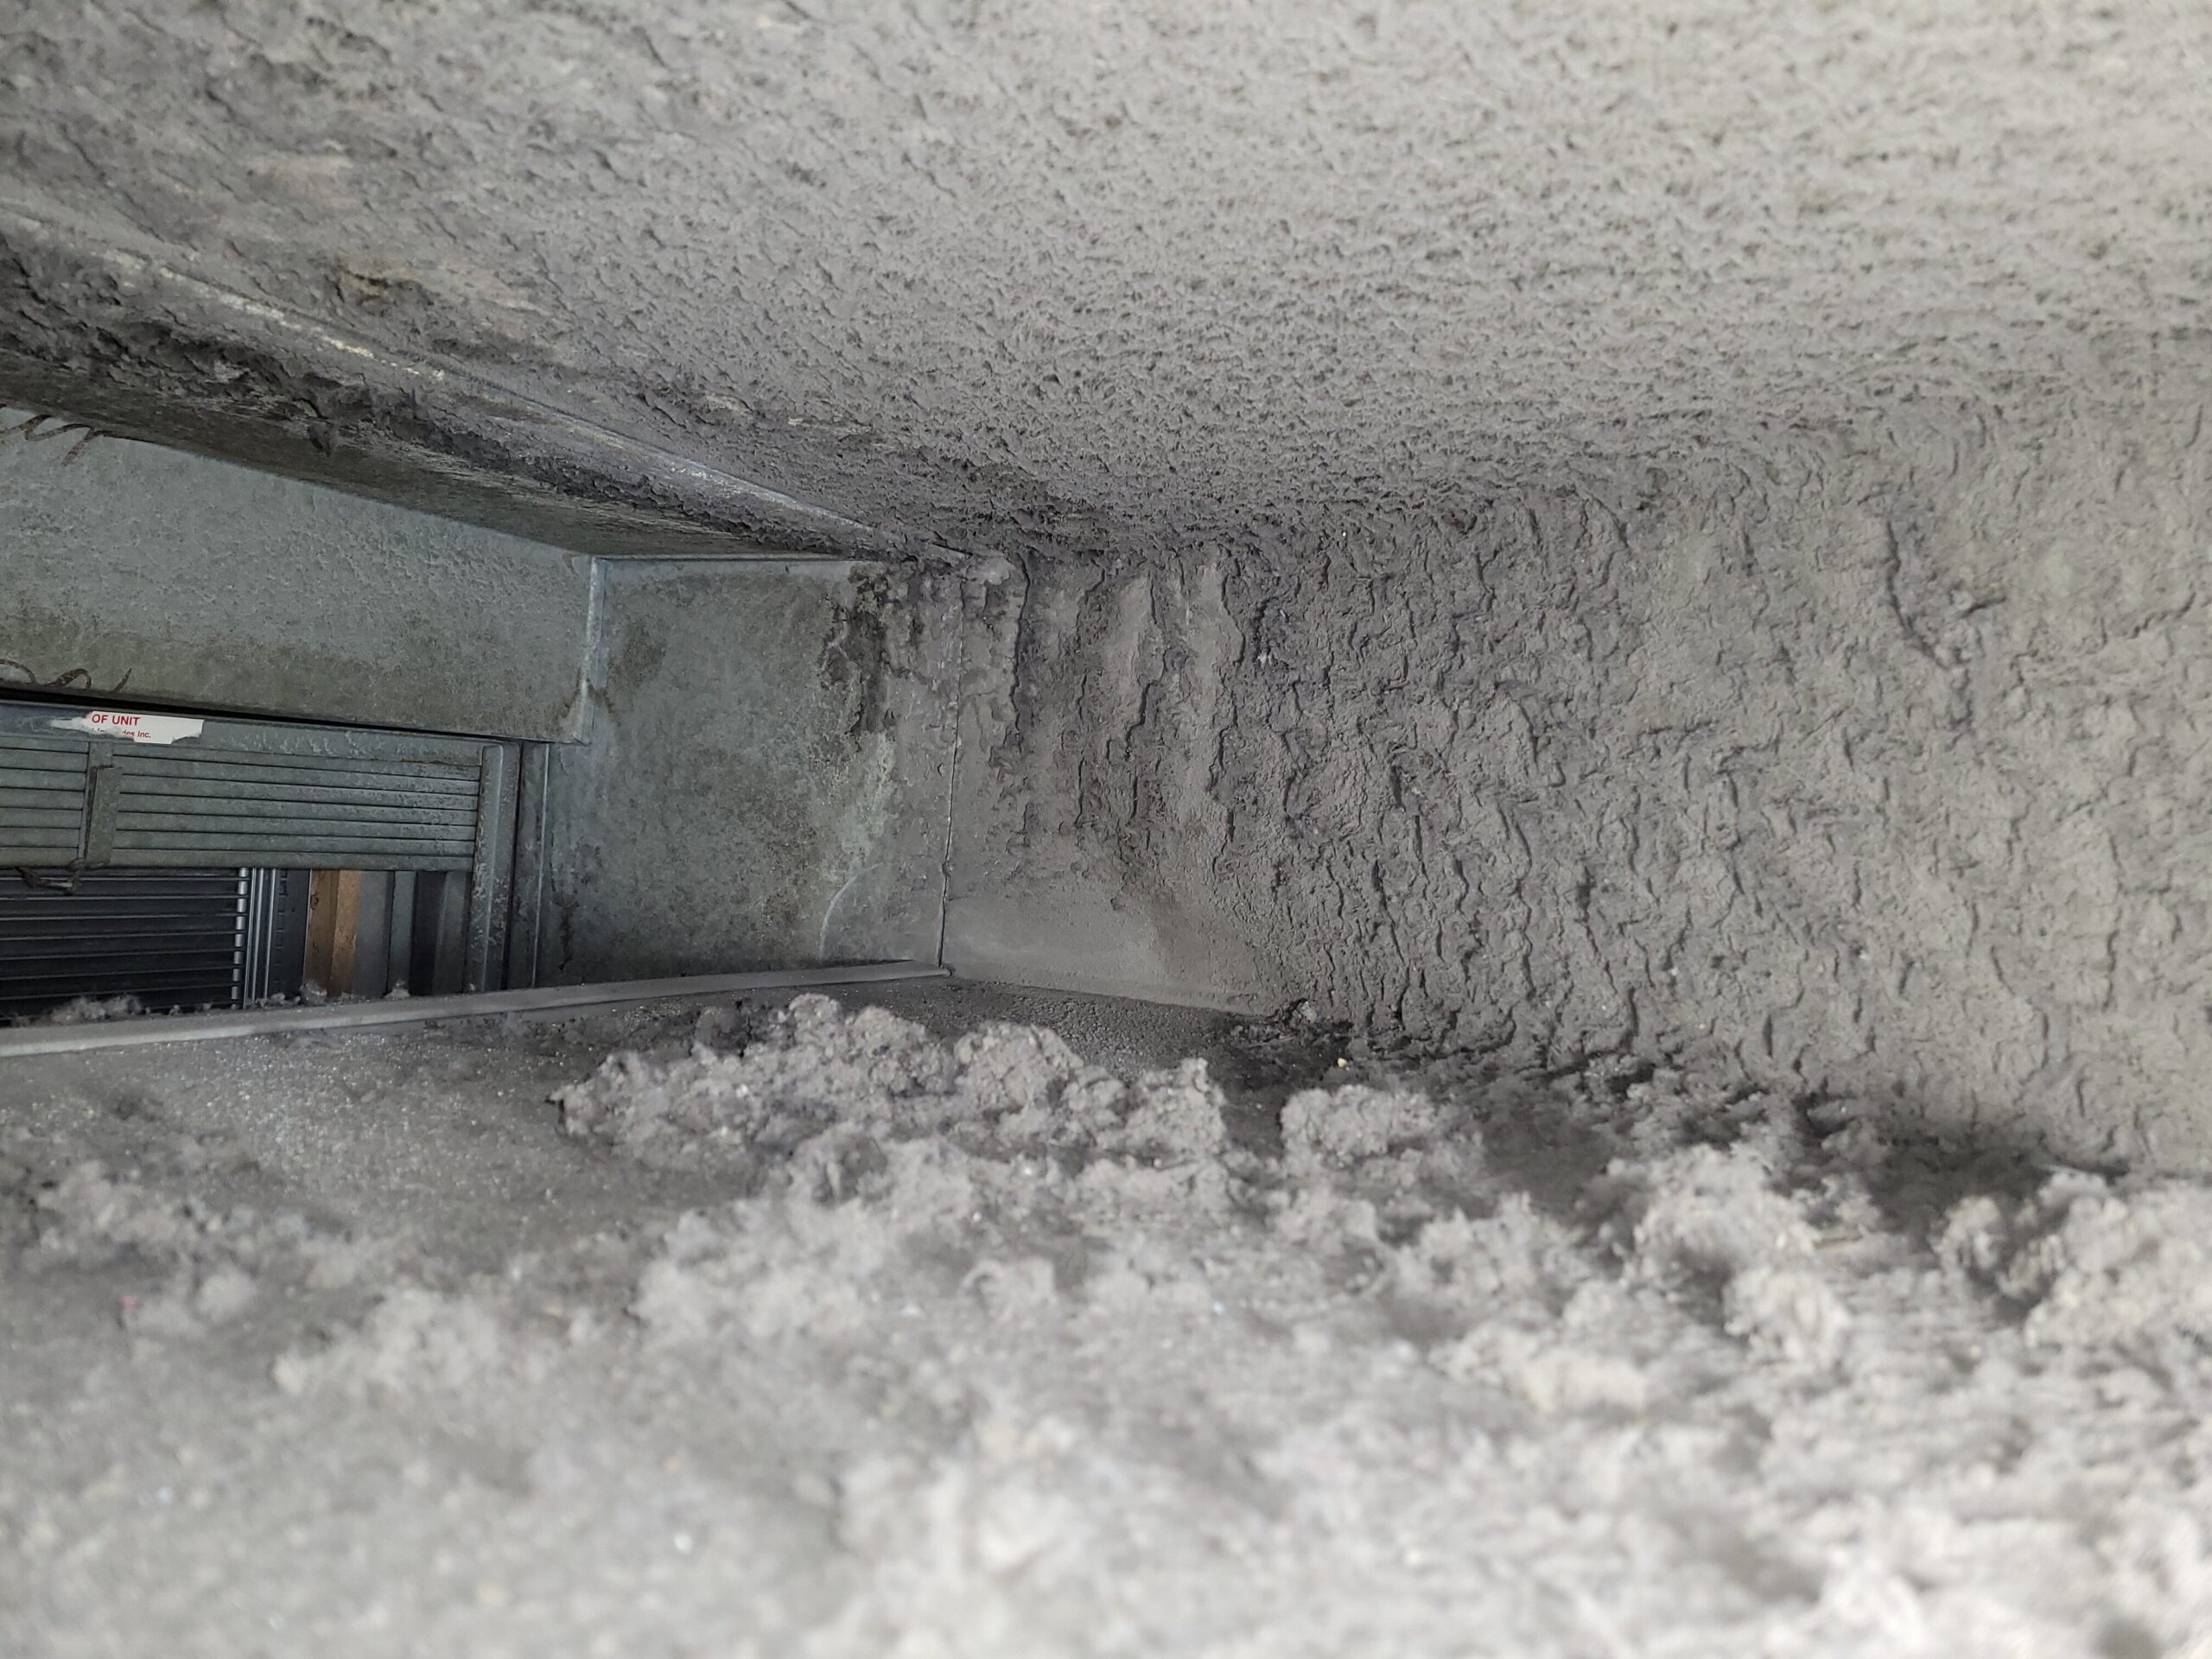
The simplest mental model is this. Dust accumulates on rough surfaces and in low-velocity sections. If relative humidity sits above about 60 percent for long stretches, or if surfaces cool below the airstream dew point, that dust film gets damp enough for microbes to thrive. Biofilms form, spores take the ride, and now your supply air carries a persistent mustiness that no custodial budget can mop away.
When you clean ducts thoroughly, you remove the food. When you control humidity, you remove the water. Do both, and your nose, and your maintenance crew, will notice.
What “Commercial Duct Cleaning” Actually Means
People often picture a big vacuum truck and someone with a brush on a pole. That is part of it, but a competent project is more deliberate. The standard approach in North America follows the NADCA ACR Standard. Source removal is the heart of the method: dislodge and capture debris under controlled negative pressure so contaminants do not end up in the occupied space.
A proper scope hits more than sheet metal. Think air handling units, coils, drain pans, fan housings, reheat boxes, turning vanes, and, importantly, internal insulation. Negative air machines with HEPA filtration keep the mess contained. Agitation tools vary with the job, from manual brushing to pneumatic whips and robotic crawlers with cameras for large trunks. Good contractors document before and after with photographs that show location references, not just close-ups of a shiny elbow.
Disinfectants and coatings get discussed a lot. Use them carefully. Biocides should be selected and applied under label restrictions, and only after physical cleaning, not instead of cleaning. Coatings have a role for stabilizing slightly degraded duct liner, but they need a dry substrate and the right temperature window to cure. Painting over wet or moldy insulation is like spraying cologne on gym socks. It does not end the problem, it perfumes it.
Humidity Problems That Cleaning Can Fix, and Those It Cannot
Here is where people get tripped up. Cleaning is not a dehumidification strategy. If your building frequently sees return air dew points in the high 60s Fahrenheit, the ducts will just get dirty again, only this time with a film. That said, cleaning can break the cycle by removing a microbial foothold, restoring coil heat transfer, and reestablishing designed airflow.
In practice, cleaning helps humidity control in three ways:
- It restores airflow across coils, which can improve latent removal. A fouled coil behaves like a thinner coil. Air zips by, picks up less cooling and dehumidification, and the system short-cycles. Clean fins recover pressure drop and contact time. It dries the air handler interior faster. Debris in the drain pan wicks water, holds it against the metal, and invites standing film. A clean pan with a clear trap drains and dries between cycles. It reduces wetting of downstream insulation. When the airstream carries less dust, there is less to stick to slightly cool surfaces beyond the coil. Less dust means fewer damp spots, fewer microbial launch pads.
Cleaning cannot fix mis-sized equipment, a broken reheat valve that forces the coil to run warm, a lazy economizer that drags in muggy outdoor air, or a controls sequence that never allows full dehumidification cycles. Those are design and tuning problems.
How to Tell if Ducts are Part of the Humidity Story
Start with a quick survey and a few measurements. Absolute humidity, not just temperature and relative humidity, tells you the plot. A handheld meter that reads dew point or grains per pound will save arguments. If the supply dew point sits near the room dew point, you are not dehumidifying much. If the room dew point spikes when the system goes to economizer, or when a process line ramps up, you have a load or control issue. If the room dew point is reasonable yet the odors and visible growth persist at certain diffusers, you may have local wetting from sweating ducts or water washover at the coil.
Air handler interiors tell tales. Is the downstream face of the cooling coil clean and bright, or filmed and furry? Are drain pans sloped, uncracked, and bone dry between compressor calls? Is there Advanced Environmental Service any water line on the interior insulation, any softness when you press the liner with a gloved finger? Duct takeoffs near the coil that show blackish sticky buildup are almost always catching wet dust.
Duct pressure and balancing matter too. Negative pressure in return chases moisture through every pinhole in the roof curb or plenum. Positive pressure in supply, especially above drop ceilings, can push cooled, humid air into cavities where it condenses on colder surfaces. A few minutes with a manometer clarifies which way the wind is really blowing.
A Flour-Dusted Bakery That Would Not Dry Out
One bakery I worked with had a constant musty smell by the front counter and a humidity number that hovered in the mid-60s percent on warm days. Flour everywhere, proofers steaming like kettles, and an air handler that had not seen the inside of its coil in years. We measured supply air at 60 F dry-bulb with a dew point only a couple degrees lower than the room. Translation, almost no latent work.
We cleaned the coil, the drain pan, and the first 40 feet of downstream duct where damp dust had formed a gray felt. We also tuned the controls to drop supply dew point to the mid-50s with a small reheat coil to prevent overcooling the space. The building finally smelled like bread and butter. The lesson, the duct cleaning knocked out the biofilm and the smell, the controls change actually handled the moisture. The two moves together worked. Either one alone would have disappointed the owner.
Lined Ducts, Bare Metal, and Why Materials Matter
Internal duct liner is quiet and thermally helpful, but it is also a sponge with a haircut. In normal, dry service it behaves well. In humid service with periodic wetting, it holds just enough moisture and dust to grow trouble near elbows and branch takeoffs. When liner gets water damaged or loses surface integrity, cleaning becomes a stopgap. You can HEPA vacuum and apply a bridging coating to reestablish a smooth face, but if the liner is soft or friable, replacement is the honest answer.
Bare galvanized duct resists growth better, provided seams are tight and exterior insulation has an intact vapor barrier. I have seen more condensation problems from poorly taped external insulation seams than from any other single cause. Vapor always follows the gradient. If the cold surface is reachable by moist air, it will be reached.
Mold: Conditions, Myths, and Practical Remediation
Mold needs moisture, a little food, and time. Given temperatures common in commercial buildings, that means relative humidity above roughly 60 percent for at least a couple days, or surfaces below dew point long enough for a film to form. Spores are always present, so the question is whether the surface environment invites them to unpack their bags.
In ducts, you usually find growth in three places. On dirty coils and drain pans, on rough internal insulation downstream of coils, and at terminal boxes where cold air meets unconditioned cavities. Clean metals with a detergent and physically remove growth. Porous liner that has growth into its fibers should be cut out and replaced, not treated like a countertop. If a contractor proposes spraying a biocide as the primary fix without removal, ask them to show you the product label, the post-cleaning moisture levels, and their plan for verification. Surfaces should be visibly clean and dry first, then selectively treated if policy allows.
Scheduling Around Operations Without Wrecking Your Week
Duct cleaning in operating businesses is part choreography, part diplomacy. You need access, you need time, and you need to keep debris from freelancing into occupied areas. For high-traffic buildings, third shift mobilizations work best. Negative air machines and containment barriers go up around access panels. Fire alarm techs may need to bypass smoke detectors temporarily while work proceeds.
Noise is real. Pneumatic whips, vacuums, and lifts make it tough for call centers and hotels. You can phase work, isolating sections, or schedule the worst of it for the least sensitive windows. Thoughtful contractors leave systems at least as functional at the end of each shift as at the start. That includes reengaging smoke detectors, removing all blocks from fire dampers, and resetting any temporarily disabled safeties.
How Often Should You Clean
There is no single timer that dings. Frequency depends on use, filtration, and control of moisture. As a rule of thumb, offices with good filtration and steady hours might go 5 to 8 years between thorough cleanings, with coil and pan service every cooling season. Healthcare, food processing, and dusty light industrial spaces trend shorter, sometimes 1 to 3 years for major sections, because loads are higher and tolerance for odor or particulate is lower.
Watch the data, not the calendar. Pressure drop across coils, trend lines of supply dew point versus setpoint, and visual inspections of representative sections tell you when to act. If you find sticky films on sample plates in a year, do not wait for five. If you open a section after four years and it looks like it did six months after the last cleaning, spend your funds on filtration upgrades and controls tuning instead.
What to Ask a Contractor Before You Sign
A good commercial duct cleaning contractor will not bristle when you ask about their methods. If they are NADCA certified, that is a plus, not a guarantee. Look for clarity on how they will access each section, how they will maintain negative pressure, and how they will protect coils and sensitive components. Ask whether they will include the air handler interior, the coil faces, the drain pans, and the first lengths of downstream duct, not just the easy straight runs.
Photographic documentation should be part of the proposal, with location tags that make sense later. If they propose chemicals, review the safety data sheets and application constraints. Ask how they will handle any internal insulation that is degraded or visibly affected by moisture. If they suggest a coating, ask about substrate preparation, cure times, and whether the system can run during cure.
Finally, confirm verification. That can be visual with photo logs and supervisor signoff, and in some cases particle counts or surface sampling if a facility policy calls for it. Do not pay solely on a promise that the negative air machine ran for a while.
Humidity Control, the Other Half of the Story
Good humidity control is not just a lower temperature. You need latent capacity, logic that uses it, and a place to put the condensed water that is not the supply duct. Several strategies work, depending on your climate and building use.
Dedicated outdoor air systems do the heavy lifting by drying ventilation air to a low dew point, then distributing it across zones. Packaged units with hot gas reheat can wring moisture without overcooling. Desiccant wheels help in very humid climates or where low dew points are nonnegotiable, like museums. Demand control ventilation trims outdoor air intake when occupancy drops, avoiding unneeded moisture loads on sticky days. Economizers need dew point logic, not just dry-bulb, otherwise you import muggy air during shoulder seasons.
Controls integration is usually where things fall apart. A humidistat set to 50 percent, installed above a warm copier, will cause mischief. Place sensors where the zone really lives. Calibrate them. Trend supply air temperature and dew point against setpoints, and look at fan speed or coil valve positions. If the coil is at 100 percent every afternoon and you still cannot keep dew point under control, you have a load or capacity mismatch. If the coil cycles on and off with supply dew point linesawing across the setpoint, you may need better modulation or a small reheat to prevent overshoot and short cycling.
Shoulder Seasons, the Trickster Months
Buildings misbehave in spring and fall. Outdoor temperatures are friendly, outdoor dew points float high after rain, and indoor latent loads are still there. Economizers open, sensible cooling comes for free, and, in that moment, the system forgets about humidity. Supply air is cool enough, not dry enough, and your ducts become a slightly chilly metal cave. If perimeter zones have fan-powered boxes that run continuously, they can pull humid plenum air through small leaks and cold surfaces will condense. Plan economizer logic with a dew point veto and verify that plenum pressures are where you expect.
Monitoring That Catches Problems Early
A handful of sensors pays for itself. At minimum, log space dew point, supply dew point, and coil leaving air temperature. If you can, log return dew point too. Watch pressure drop across coils and filters. Install float switches in drain pans that alarm before water crosses the pan lip. If a data point drifts over weeks, you will catch a clogged trap, a failing condensate pump, or a control sequence that changed after an update. A small building can do this with a few networked sensors and a careful eye on trend graphs. A large campus can fold it into the BAS.
The Money Talk, With Realistic Expectations
People ask for dollar per duct foot numbers. They vary wildly, and for good reason. Access, contamination level, and after-hours work move the price the most. For a medium-complexity office with accessible ducts, pricing might land in a band of a few dollars per linear foot of main duct and a smaller figure for branches, or a per air handler figure from a couple thousand to more for large built-up units. Healthcare and food processing projects cost more because of containment, verification, and schedule constraints.
Energy savings are real when coils and fans are involved. A fouled cooling coil can add measurable pressure drop and lose heat transfer. Cleaning often recovers enough efficiency to shave fan power and reduce compressor run time. I have seen seasonal energy use drop by 5 to 15 percent in units that were truly impacted, mostly from restored airflow and better latent performance. Treat those numbers as the possible upside, not a promise. The safer justification includes indoor air quality gains, risk reduction for microbial growth, and avoided complaints that burn staff time.
Edge Cases That Change the Rules
Not every building plays by office rules. Hospitals and labs use higher filtration and often have humidity control as a critical parameter. Duct cleaning is more targeted and often more frequent in certain zones, with rigorous isolation and verification. Data centers run dry out of necessity. Duct interiors are usually cleaner by default, but coils and underfloor plenums can become dust farms if filtration is lax. Museums, archives, and libraries live and die by stability. Humidity control rules the schedule, and any cleaning that disturbs finishes or introduces off-gassing chemicals is unwelcome. Indoor pools might be the toughest: corrosive air, relentless moisture, and ducts that need premium materials and vigilant inspection. Cleaning helps, but design and coatings carry most of the load.
A Short Pre-Clean Survey You Can Do This Week
- Pull the access panel and photograph coil upstream and downstream faces, full frame with a reference. Check the drain pan slope, cleanliness, and trap seal. Pour water and watch it leave. Measure supply air dew point, not just temperature, at the unit and at a representative diffuser. Press on internal insulation near the coil. If it is soft or leaves residue on a glove, plan for replacement. Trend your economizer position against indoor dew point for a week. Look for muggy hours with the damper open.
After the Cleaning, Keep It That Way
- Move to MERV ratings that your fan can handle. Capture more dust upstream of coils and ducts without choking airflow. Seal obvious duct leaks during access. Every hole is an invitation for unconditioned air. Tune the dehumidification sequence. Hit a dew point, then reheat just enough to avoid overshoot. Verify traps and drains quarterly during cooling season. Dry pans are your best friend. Schedule a one-year inspection window. If debris returns quickly, fix the cause, not just the symptom.
The Quiet Metric That Matters Most
If you only track one number for a while, track dew point. Temperature and relative humidity are fair-weather friends. Dew point tells the truth about how much moisture is in the air and whether your system is actually removing it. Tie that to what you see and smell. A room at 73 F with 50 percent RH and a supply plenum that looks like a stainless steel salad bowl will likely stay well behaved. A room at 70 F with 55 percent RH and a supply duct that feels cool to the touch above a wet ceiling tile is an incident waiting to be logged.
Commercial duct cleaning fits into that story as the hygiene program that starves microbes, protects the coil’s performance, and removes the grime that amplifies humidity missteps. Do it with a clear scope, partner it with honest humidity control, and your building will stop writing you smelly little notes from the ceiling.